In the world of web development, getting real-time data is crucial for building modern, interactive applications. While traditional APIs require you to constantly ask for new information, webhooks flip the script, pushing data to you the moment an event happens. This guide provides a comprehensive webhook example, walking you through the concepts, creation, and testing of a webhook receiver using NodeJS.

We’ll break down how webhooks work, build a simple yet functional Express.js application to handle incoming webhook requests, and use Tunnelmole to expose our local development server to the public internet for end-to-end testing. By the end, you’ll have a solid understanding and a practical foundation for integrating webhooks into your own projects.
What is a Webhook? The “Reverse API” Explained
At its core, a webhook is an automated message sent from one application to another when a specific event occurs. Think of it as a “user-defined HTTP callback.” Instead of your application polling an API every few minutes to ask, “Is there any new data yet?”, the service provider directly sends a request to a URL you specify—your webhook URL—as soon as the data is available.POST
This “push” model is far more efficient than the “pull” model of traditional APIs.
- Pull Model (Traditional API): Your application is responsible for making requests to a server to get information. It’s like calling the post office every hour to see if you have mail. It’s resource-intensive and can lead to delays in receiving data.
- Push Model (Webhook): The server is responsible for sending information to your application when an event occurs. The post office delivers the mail directly to your mailbox as soon as it arrives. This is efficient, provides data in near real-time, and reduces unnecessary network traffic.
Common Webhook Use Cases
Webhooks are the backbone of modern automation and integration. Here are a few real-world examples:
- Payment Gateways: Stripe sends a webhook when a customer’s payment succeeds, a subscription is canceled, or a dispute is raised.
- Version Control: GitHub uses webhooks to notify other services about events like code pushes, pull requests, or new issues. This is how CI/CD pipelines (like Jenkins or GitHub Actions) are automatically triggered.
- eCommerce Platforms: Shopify can send a webhook when a new order is placed, inventory levels change, or a customer updates their information.
- Communication Tools: Slack can receive webhooks to post messages into a channel, and Twilio uses them to notify your app about incoming SMS messages or phone calls.
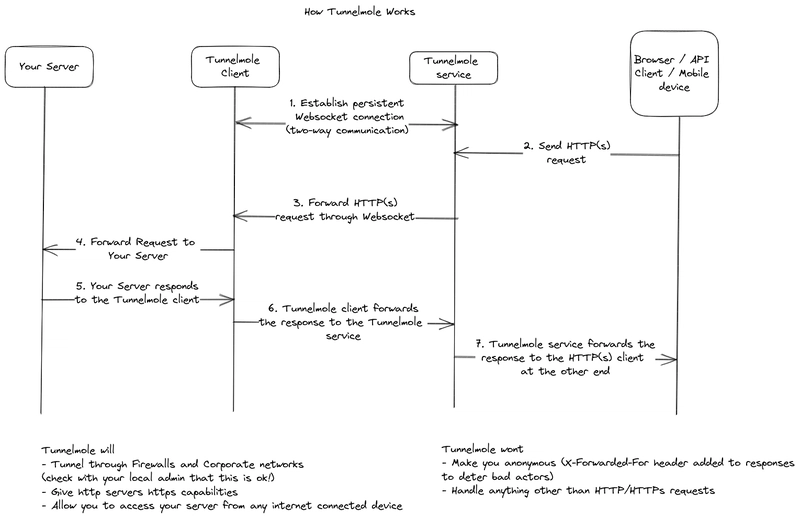
To handle these incoming requests during development, your application, which typically runs on , needs to be reachable by these external services. This is where a tunneling tool becomes essential.localhost

As the diagram illustrates, a service like Tunnelmole creates a secure connection from a public URL on the internet to your application running on your local machine. The webhook provider sends its request to the public URL, Tunnelmole forwards it to your local app, and you can debug and process it in real-time.
Prerequisites
Before we build our webhook example, make sure you have the following tools installed on your system:
- Node.js and npm: Download and install it from the official Node.js website. npm is the Node Package Manager and comes bundled with the installation.
- A Code Editor: Any text editor will work, but Visual Studio Code is a popular choice for JavaScript development.
- Tunnelmole: A simple, open-source command-line tool for creating public URLs for your local servers.
You can install Tunnelmole with a single command.
For Linux and macOS:
curl -O https://install.tunnelmole.com/xD345/install && sudo bash install
For Windows:
- Download tmole.exe.
- Place the executable in a folder that is part of your system\’s .
PATH
Now, let\’s start building.
Building Our Webhook Example: A NodeJS and Express App
We’ll create a simple server using Express.js, the most popular web framework for Node.js. This server will listen for incoming requests on a specific endpoint.POST
Step 1: Set Up the Project
First, create a new directory for your project and initialize it with npm.
mkdir webhook-receiver-example
cd webhook-receiver-example
npm init -y
This creates a file. Now, let\’s install Express and , a middleware used to parse incoming request bodies.package.jsonbody-parser
npm install express body-parser
Step 2: Write the Express Server Code
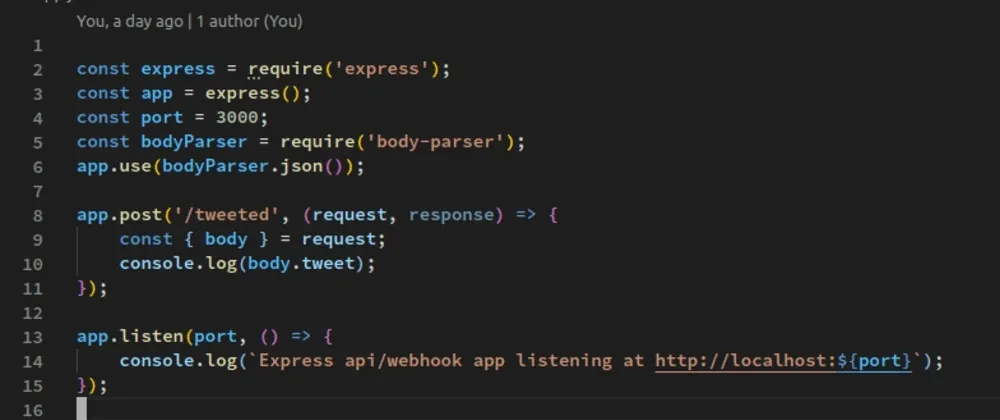
Create a file named in your project directory and add the following code:index.js
const express = require('express');
const bodyParser = require('body-parser');

// Initialize the Express app
const app = express();
const port = 3000;

// Use body-parser middleware to parse JSON request bodies
app.use(bodyParser.json());

// Define a welcome message for the root URL
app.get('/', (req, res) => {res.send('Welcome to the Webhook Receiver! Use the /webhook-example endpoint for POST requests.');
});

/**
 * This is our main webhook handler endpoint.
 * It listens for POST requests and logs the received body.
 */
app.post('/webhook-example', (req, res) => {console.log('--- New Webhook Received ---');

    // The webhook payload is in the request body
    const payload = req.body;

    console.log('Headers:', JSON.stringify(req.headers, null, 2));
    console.log('Payload:', JSON.stringify(payload, null, 2));

    // You can add your processing logic here.
    // For example, save data to a database, trigger an email, etc.

    // Respond to the webhook provider to acknowledge receipt
    res.status(200).send('Webhook received successfully!');
});

// Start the server and listen for connections
app.listen(port, () => {console.log(`Server is running on http://localhost:${port}`);
    console.log('Listening for webhooks at the /webhook-example endpoint.');
});
Let\’s break down this code:
- We import and .
expressbody-parser app.use(bodyParser.json());tells Express to automatically parse incoming request bodies that are in JSON format. This is how most webhook providers send their data.- The block defines our webhook handler. It only responds to requests sent to the URL.
app.post('/webhook-example', ...)POST/webhook-example - Inside the handler, we log the request headers and the payload () to the console. This is where you can see the data sent by the webhook provider.
req.body - Finally, sends a success response back to the provider. This is important—if the provider doesn\’t receive a status, it might assume the delivery failed and try to send the webhook again.
res.status(200).send(...)200 OK
Step 3: Run the Server
Start your local server by running the following command in your terminal:
node index.js
You should see the output:
Server is running on http://localhost:3000
Listening for webhooks at the /webhook-example endpoint.
Your webhook receiver is now running locally, but it’s not accessible from the internet. Let\’s fix that.
Step 4: Expose Your Local Server with Tunnelmole
With your Node.js server running, open a new terminal window and run Tunnelmole to get a public URL.
tmole 3000
Tunnelmole will connect to its service and generate a public URL that forwards to your local port . The output will look something like this:3000
Your Tunnelmole Public URLs are below and are accessible internet wide. Always use HTTPs for the best security

https://k29d1m-ip-XX-XX-XX-XX.tunnelmole.net ⟶ http://localhost:3000
http://k29d1m-ip-XX-XX-XX-XX.tunnelmole.net ⟶ http://localhost:3000
Grab the HTTPS URL. This is your public webhook URL. In this example, our full webhook endpoint is .https://k29d1m-ip-XX-XX-XX-XX.tunnelmole.net/webhook-example
Why Tunnelmole? Transparency and Control
One of the key advantages of using Tunnelmole is its commitment to open source. Both the client you just installed and the server it connects to are fully open source. This offers two significant benefits for developers:
- Transparency: You can inspect the code yourself to understand exactly how it works and ensure it meets your security standards.
- Self-Hosting: For maximum control and privacy, you can host the Tunnelmole service on your own infrastructure. This is ideal for corporate environments with strict data policies or for developers who prefer to manage their own tools.
Step 5: Test the Webhook
Now for the exciting part—let\’s send a test webhook to our public URL to see if everything works. We can simulate a webhook provider using a simple command.curl
Open a third terminal window and run the following command. Make sure to replace the placeholder URL with your actual Tunnelmole URL.
curl -X POST \
  https://YOUR-UNIQUE-SUBDOMAIN.tunnelmole.net/webhook-example \
  -H 'Content-Type: application/json' \
  -H 'X-Custom-Header: TestFromCurl' \
  -d '{"event_type":"user.created","timestamp":"'$(date -u +"%Y-%m-%dT%H:%M:%SZ")'","data": {"user_id":"usr_12345","name":"Jane Doe","email":"[email protected]"}
  }'
If successful, will print .curlWebhook received successfully!
Now, look at the terminal where your application is running. You should see the logged output from the webhook:index.js
--- New Webhook Received ---
Headers: {
  "content-type": "application/json",
  "x-custom-header": "TestFromCurl",
  "host": "k29d1m-ip-XX-XX-XX-XX.tunnelmole.net",
  "accept": "*/*",
  "content-length": "164",
  ...
}
Payload: {
  "event_type": "user.created",
  "timestamp": "2025-07-15T10:30:00Z",
  "data": {
    "user_id": "usr_12345",
    "name": "Jane Doe",
    "email": "[email protected]"
  }
}
Congratulations! You have successfully built, exposed, and tested a webhook receiver from start to finish.
Expanding the Example: Production Considerations
This webhook example provides a solid foundation, but for a real-world application, you need to consider a few more things, especially security.
Securing Your Webhook
Since your webhook URL is public, anyone could potentially send requests to it. To ensure the incoming data is from a trusted source, you must verify the webhook signature.
Most webhook providers include a cryptographic signature in the request headers (e.g., for GitHub, for Stripe). This signature is typically created by hashing the request payload with a secret key that only you and the provider know.X-Hub-Signature-256Stripe-Signature
Your webhook handler should:
- Read the signature from the request headers.
- Compute its own signature using the received payload and your stored secret key.
- Compare the two signatures. If they don\’t match, reject the request.
This prevents attackers from sending forged payloads to your endpoint.
Conclusion
Webhooks are a powerful tool for building event-driven, real-time applications. By pushing data instead of waiting for it to be pulled, they enable efficient and instant communication between services. In this guide, we\’ve walked through a complete webhook example, from creating a listener in Node.js to exposing it with the open-source tool Tunnelmole and testing the entire flow.
The key takeaways are:
- Webhooks are HTTP POST requests triggered by events.
- You need a public URL to receive webhooks during local development, and Tunnelmole provides a simple, open-source way to get one.
- Always respond with a status to acknowledge receipt.
200 OK - For production use, securing your webhook endpoint by verifying signatures is non-negotiable.
With this knowledge, you are now well-equipped to start integrating webhooks from services like Stripe, Shopify, GitHub, and more into your own projects.


