
Git from Scratch: Step-by-Step Practical Guide | Complete Tutorial for Beginners (Installation, Branches, Collaboration)
Preface: Understanding Git
Git is an open source distributed version control system used to efficiently manage file changes (especially code), record the history of every modification, and support multi-person collaborative development.
Git Advantages
- Version traceability: locate code differences between any versions (such as git diff);
- Branch collaboration: multiple people can develop in parallel without conflicts (branch creation/merging);
- Secure backup: local + remote warehouse dual protection, data will never be lost.
In one sentence: Git = a time machine for file changes + a bridge for team collaboration + a guardian of code security
1. Getting Started – Installation and First Experience
1.1 Embarking on the Git journey – Downloading and installing
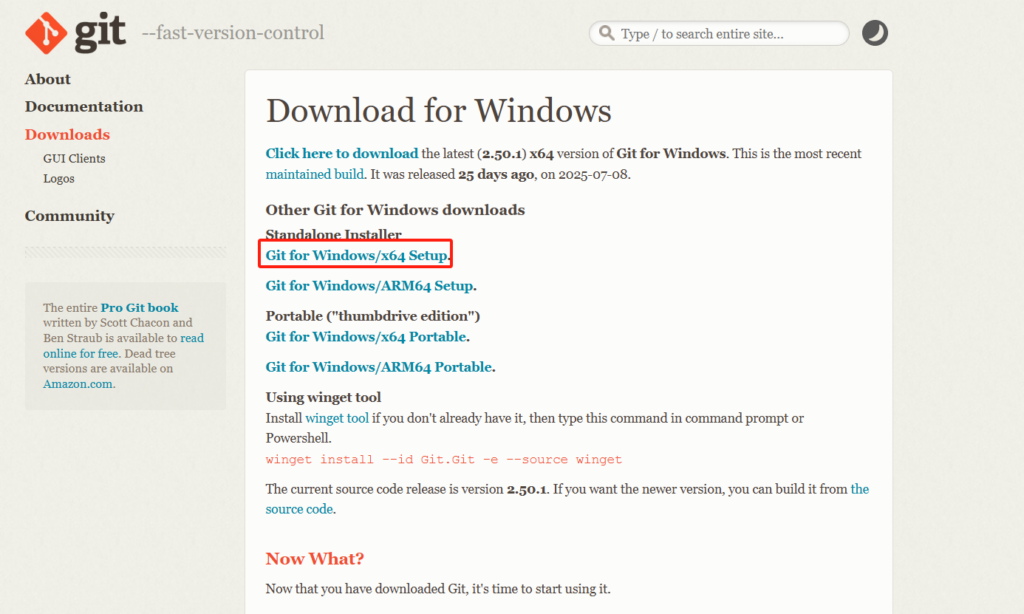
(1) Official download:
Download address : Git – Downloads (using Windows as an example)
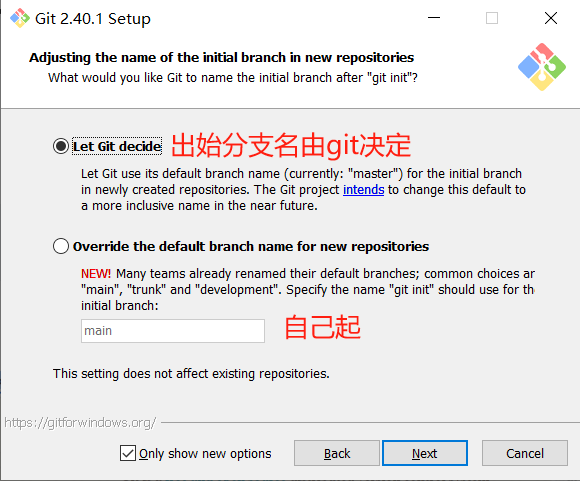
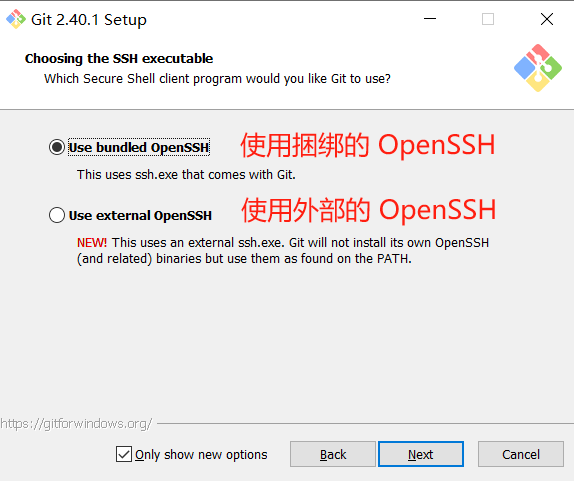
(2) Installation Wizard:
After downloading, double-click the exe file. I am using the Git-2.40.1-64-bit version. You can select the following interface according to your needs, or just follow the default Next.
(3) Verify the installation:
After the installation is complete, open Git Bash and execute the following command to verify the installation. The displayed version number proves that there is no problem.
$ git --version<br># Execution results<br>git version 2.40.1.windows.11.2 First close contact – basic configuration and warehouse creation
(1) Identify your identity: Configure global user information
# Configure user.name and user.email. It's recommended to use a real email address for user.email.
$ git config --global user.name "your username"
$ git config --global user.email "your email address"

# Check if the changes have taken effect
$ cat .gitconfig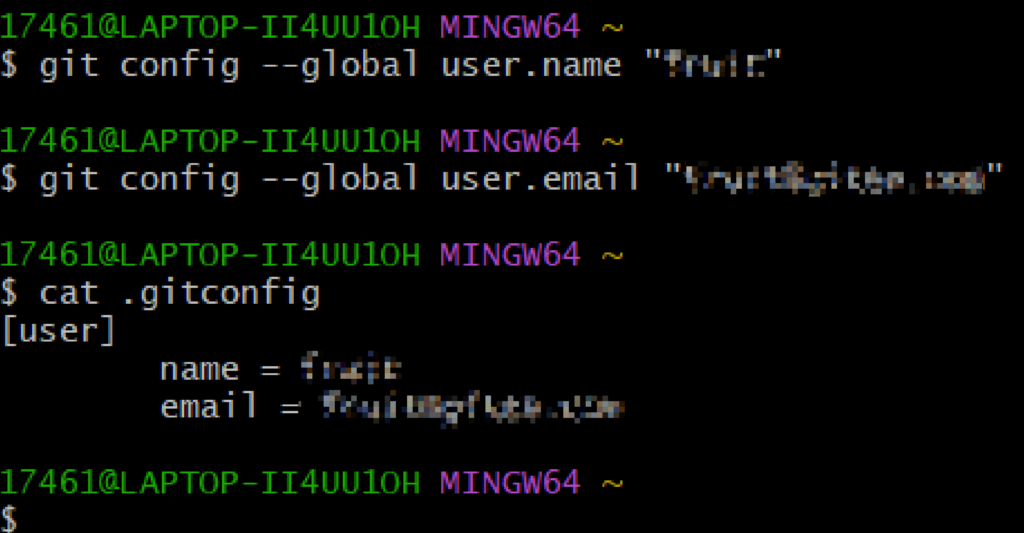
(2) Choose your editor (optional): Configure the default text editor (such as VS Code, otherwise it is usually vim)
# Configure VS Code
$ git config --global core.editor "code --wait"

# View the globally configured text editor
$ git config --global core.editor

# Execution results
code --wait
(3) Initialization! Create your first Git repository
# Repository initialization
$ git init
# Execution result
Initialized empty Git repository in C:/Users/17461/learn/.git/

# Observe the hidden .git folder - the "brain" of Git
$ cat .git/config
# Execution result explanation
[core]
repositoryformatversion = 0 # Repository format version (fixed to 0)
filemode = false # Log file permission changes (common on Linux/macOS, usually false on Windows)
bare = false # Is this a bare repository? (false indicates a regular repository with a workspace)
logallrefupdates = true # Log updates to all references (branches, tags)
ignorecase = true # Ignore filename case (common on Windows/macOS)
editor = code --wait # Default text editor for this repository (overrides the global one)
(4) Initial glimpse of the state:
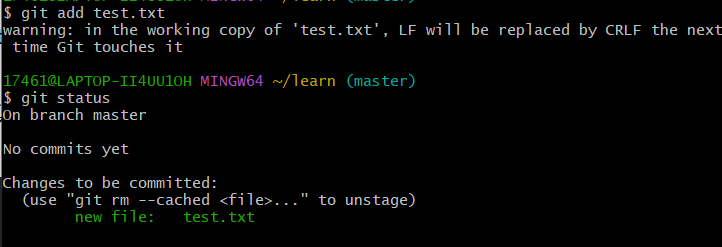
- Untracked state: Usually located under the Untracked files: title and displayed in red text, it is not yet managed by the Git repository
- Staged state: Usually located below the Changes to be committed: title and displayed in green text, it has been added to the staging area via the git add command
# 1. Create a new test file
$ vi test.txt

# Save and check the status
$ git status

# Add the file to the staging area
$ git add test.txt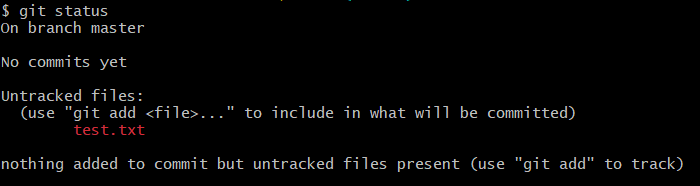
2. Core Engine – Submissions, History, and Workflow
2.1 Understanding Git’s “magic” – Workspace, Staging Area, and Warehouse
(1) Working Directory
- Your editing sandbox : directly see the project files
- Status :
✅ Untracked files (new files)
✅ Modified but not staged (changed files)
⚠️ All changes have not yet been recorded by Git
(2) Staging Area
- Submitted preview table :
git addthe file storage area after - Core functions :
✨ Accurately filter the content to be submitted (files/code blocks)
✨ Build atomic submissions (avoid mixed modifications) - ⚡️ Temporary storage → Not permanently saved if not committed
(3) Repository
- History Vault :
.gitDatabase under the Catalog - Core capabilities :
🔒 Permanently store commits (git commitsnapshots)
🔄 Record complete history of branches/tags, etc. - ⚡️ Data cannot be tampered with → Submission chain that only increases but never decreases
(4) A concise summary of Git’s three core areas
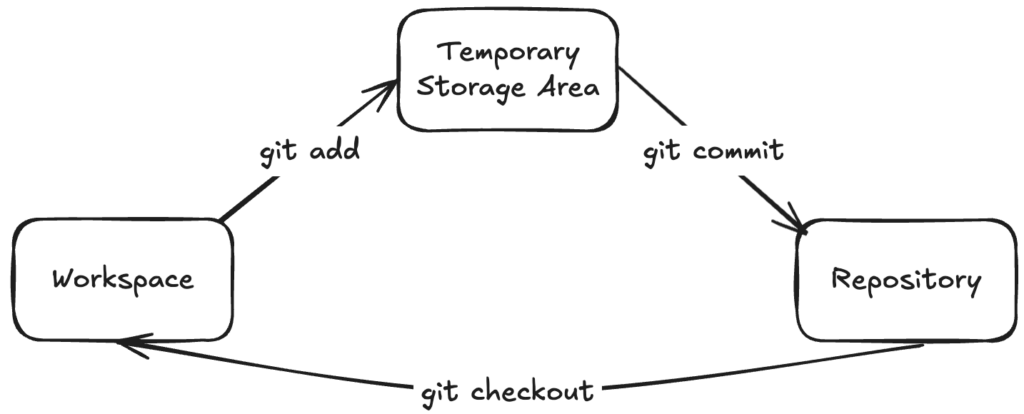
2.2 Record your footprints – add (git add) and submit (git commit)
(1) Add (git add)
git add It is the core command to add changes (additions, modifications, deletions) in the workspace to the staging area . It is a “preparatory action” before submission to ensure that the changes that need to be recorded are tracked by Git.
# Staging only the current changes (modifications/additions/deletions) of the specified file; other files remain unchanged.

git add <filename>

# Adds all new files and modifications/deletions of tracked files in the current directory (including subdirectories), but excludes deleted untracked files.

git add .

# Adds all changes, including new files, modifications/deletions of tracked files, and deleted untracked files. This provides more comprehensive coverage than git add .

git add -A (or git add --all)
(2) Commit (git commit)
git commit Submitting changes in the staging area to the local repository to generate an unmodifiable history node is the core operation of Git to record project history.
# Package all changes in the staging area into a "commit record", save it to the local repository, and generate a unique identifier (SHA-1 hash value).
git commit -m "clear, meaningful commit message"
(3) Summary:
git add Responsible for “selecting the content to be submitted” and git commit “archiving the selected content as a historical node”. The two work together to complete the version record of the local code and are the basis of the Git workflow.
2.3 Back in Time – Viewing History and Differences (git diff)
(1) Browse the history log: git log – View the submission record (common options: --oneline, --graph, --pretty)
# Simple mode: displays only the first 7 digits of each commit hash and the commit message, perfect for quickly browsing history.
git log --oneline

# Displays branch and merge history in a graphical format, visually illustrating branch relationships (e.g., * represents commits, | represents branch lines).
git log --graph
# Customize the output format. Commonly use --pretty=fuller to display the full commit information (including author, committer, and timestamp), or --pretty=format:"%h %an %s" to extract information on demand (%h short hash, %an author name, %s commit message).
git log --pretty=<format>

# Displays the commit history and merge relationships of all branches in a graphical line graph.
git log --graph --oneline --all
(2) Sharp Eyes: git diff – Compare the differences between the workspace, staging area, and different commits
# Compare the working directory with the staging area
git diff (view unstaged changes).
# Compare the staging area with the local repository
git diff --staged (view changes staged and pending).
# Compare two commits
git diff <commit1> <commit2> (e.g., git diff a3f8d2e b7c9d01 to view the difference between the two commits).
# Compare two branches
git diff branch1 branch2 (e.g., git diff main dev to view the difference between the latest commits of the two branches).
(3) View snapshot contents: git show – View detailed information about a specific commit
# View the latest commit

git show (by default, displays the latest commit pointed to by HEAD).

# View a specific commit

git show <commit hash> (e.g., git show a3f8d2e , displays detailed changes for that commit).
# View the commit corresponding to a tag

git show <tag name> (e.g., git show v1.0 , displays details of the commit pointed to by the tag).
3. The cornerstone of collaboration – branching and merging
3.1 Creating a Parallel Universe – Branching
(1) Create a branch
# Create a branch:
git branch <branch name> (e.g., git branch feature/login)

# Switch branches:
git checkout <branch name> (e.g., git checkout dev)

# Switch branches in the new version:
git switch <branch name> (more intuitive, e.g., git switch main)

# Create and switch:
git switch -c <new branch name> (create and switch in one step)
(2) View branches
# Display all local branches, with the current branch preceded by *
git branch
# Display all local and remote branches (remote branches begin with remotes/)
git branch -a
3.2 Merging
# Integrate the code of the specified branch into the current branch
git merge <branch to be merged>
4. Connecting the World – Remote Repositories and Collaboration
4.1 Building a bridge – Configuring a remote repository (Remote)
(1) What is a remote repository?
A remote repository is a Git repository hosted on a network server (such as GitHub, GitLab, Gitee, etc.). Its main functions are:
- Serves as a central hub for code sharing and collaboration, making it easy for multiple people to synchronize code;
- Provide code backup to prevent local code loss;
- Supports collaborative development among team members based on remote repositories (such as submitting, pulling, and reviewing code).
(2) Configure the remote warehouse SSH public key (no need to enter the account password every time)
# Generate a key pair
ssh-keygen -t ed25519 -C "Recommend the email address associated with the remote platform account"

# View and copy the public key content
cat ~/.ssh/id_ed25519.pub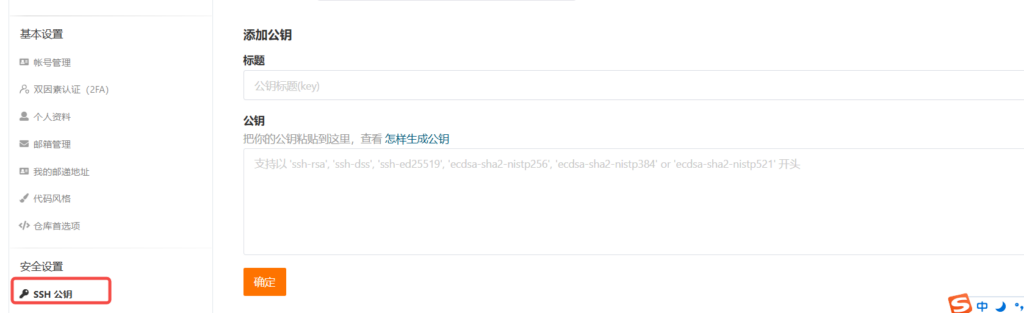
(3) Associate remote warehouse
# Associate the local repository with the remote repository.
git remote add <remote name> <repository address>
# Establish a mapping between the local repository and the remote repository. You can later refer to the remote repository using origin.
git remote add origin https://gitee.com/yourname/yourrepo.git
(4) View remote warehouse
# List all remote repositories associated with the current repository, including their names and corresponding fetch and push addresses.
git remote -v (-v indicates detailed address display)
4.2 Push and Pull – Synchronizing Your Work
(1) Clone:
# Get the complete project (git clone) - A shortcut to initialize remote connections
git clone https://gitee.com/yourname/yourrepo.git
(2) Obtaining the achievements of others: git pull = git fetch + git merge
- Detailed explanation
git fetch(get remote updates but not automatically merge)
# Get all updates from the remote repository origin

git fetch origin

# Get only updates from the remote main branch

git fetch origin main- Detailed explanation
git pull(get and automatically try to merge into the current branch)
# Compare the local branch with the remote main branch

git diff origin/main

# Manually merge remote updates into the current branch

git merge origin/main
(3) Upload your masterpiece
# Add -u to establish tracking for the first push

git push -u origin

# Simplify subsequent pushes

git push

# Push to which branch of the repository (dev, master)

git push github (repository alias) main (branch)
5. Adding the icing on the cake and removing minefields
5.1 Regret? – Undo and Reset (Use with caution!)
(1) Undo workspace modifications:git checkout -- <文件>
- Effect : Discard unstaged changes to the specified file in the workspace and restore to the most recently submitted or staged state.
- Example :
# Undo local changes to test.txt.
git checkout -- test.txt
(2) Undo the temporary storage area modification: git reset HEAD <文件> or git restore --staged <文件>
- Function : Withdraw the used
git addtemporary files from the temporary storage area (return to the “unstaged” state) without affecting the content of the workspace. - Example :
# Traditional:
git reset HEAD test.txt
# New:
git restore --staged test.txt- Applicable scenario : A file is added to the temporary storage area by mistake, and the temporary storage content needs to be reselected.
(3) Modify the latest submission:git commit --amend
- Function : Modify the comments of the most recent submission, or add missing files (need to have
git addunsubmitted files first). - operate :
# Change only the comment: After executing the command, edit the new comment and save. To add files:

git add the missing files


git commit --amend.- Note : This will overwrite the hash value of the latest commit. If the commit has already been pushed to the remote, you need to force push (
git push -f). Use with caution.
(4) Rollback submission git reset : git revert
git reset <version> (modify history, risky)- Function : Roll back the current branch to the specified version, and control the rollback range according to the parameters:
--soft: Only the submission record is rolled back, and the temporary storage area and work area remain unchanged (can be resubmitted).--mixed(Default): Roll back the submission record and temporary storage area, and the working area remains unchanged (re-creation is requiredgit add).
- Risk : Modify the history record. If the rolled-back commit has been pushed to the remote, a forced push is required, which may affect collaboration.
git revert <version> (safe rollback)- Effect : Create a new commit to offset the changes made to the specified old commit without changing the original history.
- Advantages : Safely retains the complete history, suitable for rolling back commits that have been pushed to the remote without affecting collaboration.
- Example :
# Generate a new commit to undo the changes in a1b2c3d.
git revert a1b2c3d
Appendix: Quick Lookup Table of Common Git Commands
1. Environment Configuration
| Order | effect | Example |
|---|---|---|
| git –version | Verify Installation | git --version |
| git config –global user.name “name” | Set the global username | git config --global user.name "John" |
| git config –global user.email “Email” | Set up a global mailbox | git config --global user.email "[email protected]" |
| git config –global core.editor “Editor” | Setting the default text editor | git config --global core.editor "code --wait" |
2. Local Warehouse Operation
| Order | effect | Example |
|---|---|---|
| git init | Initialize a new warehouse | git init |
| git status | Check the status of the workspace/staging area | git status |
| git add <file> | Add files to the staging area | git add index.html |
| git add . | Add all changes to the staging area | git add . |
| git commit -m “description” | Submit to local warehouse | git commit -m "Initialize project" |
| git log | View commit history | git log --oneline --graph |
| git diff | View the differences between the working area and the temporary storage area | git diff |
3. Branching and merging
| Order | effect | Example |
|---|---|---|
| git branch | View local branches | git branch |
| git branch <branch name> | Create a new branch | git branch feature-login |
git checkout <branch name> | Switch branches | git checkout main |
git switch <branch name> | (Recommended) Switch branches | git switch feature |
git merge <branch name> | Merge branch into current branch | git merge feature |
git branch -d <branch name> | Deleting a branch | git branch -d fix-bug |
4. Remote Warehouse Collaboration
| Order | effect | Example |
|---|---|---|
| git remote add <alias> <URL> | Associated remote warehouse | git remote add origin https://... |
| git clone <URL> | Clone a remote repository | git clone https://github.com/xxx.git |
| git push -u <remote> <branch> | Pushing a branch for the first time | git push -u origin main |
| git push | Push changes (associated branch) | git push |
| git pull | Pull remote updates (automatically merge) | git pull origin main |
| git fetch | Only fetch remote updates (no merging) | git fetch |
5. Undo and Repair
| Order | effect | Risk Level |
|---|---|---|
| git restore <file> | Undo workspace changes | ⚠️ Overwriting local changes |
| git restore –staged <file> | Retrieve files from the staging area | Safety |
| git commit –amend | Modify the latest submission (information/content) | Low risk |
| git reset –soft HEAD~1 | Undo commit but keep changes | Medium risk |
| git reset –hard HEAD~1 | Completely discard the most recent commit | ⚠️️ High risk (data loss) |
| git revert <commit ID> | Create a new commit to undo the old one | Safety |
6. Advanced Maintenance
| Order | effect | Example |
|---|---|---|
| git tag v1.0 | Creating a version tag | git tag v1.0 |
| git stash | Temporary storage modification | git stash |
| git stash pop | Restore saved changes | git stash pop |
| git rm –cached <file> | Remove files from Git (keep them locally) | git rm --cached .env |
| git reflog | View operation history (help command) | git reflog |
IT Resource Hub » Git from Scratch: Step-by-Step Practical Guide | Complete Tutorial for Beginners (Installation, Branches, Collaboration)


